I'm still at work, creating affordable decor pieces for our daughter's new apartment in LA.
I want her to feel nested and "at home" while she's so far from us, and I want her apartment to not resemble a left-over fraternity space...
You know what I'm talking about. Those mismatched pieces of flotsom and jetsom that all "starving artists" have at the beginning of the lives after college.
We have the means to set her up with something that reflects her sophisticated design sense, and I'm happy to oblige that with a small but doable budget.
And let's face it... I love to create and it's making for some great content for my blog! (LOL)
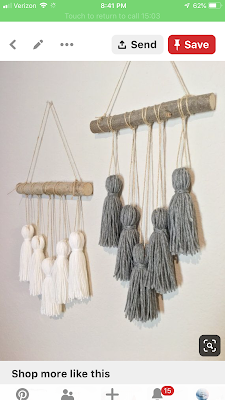
She spotted this on Pinterest.
 |
| thehomedecorguides.com |
Here's the pin link, but the internet link said there was no server. Go figure. I would really like to give credit where credit is due, but this is the best I've got.
Anywhooo...
Darling daugher liked this and I recognized it as an easy to copy project.
Here's how it went down.
I purchased this Red Heart Super Saver yarn from Wal*Mart for $2.97. I had a dowel left over from a previous project, so I decided to use that instead of hunting for the perfect straight branch.
I started by creating the 5 large tassels.
I took a book (Subconscious Power by Kimberly Friedmutter) and began wrapping the yarn length wise over the entire book. Wrapping it lengthwise gave me the size I desired for this project.
I wrapped it 100 times while I was catching up on YouTube videos.
Once I was done wrapping, I squished the yarn at the top and ran a very long strand of separate yarn under it.
I tied the top in a tight know and removed the wrapped yarn from the book.
It slid right off because the book jacket is smooth and slippery.
At this point I took a smaller length of yarn and cam down about 1.25 inches from the top.
I tied another tight know, creating the "poof" of the tassel.
I used the tails of the tied yarn to wrap around this point a few time, tied it off and tucked the short tails underneath.
Using a sharp pair of scissors, I cut the loops at the bottom and gave the tassel and even "haircut."
I repeated this process 4 more times.
I used the original tassel to get as close to the same "poofs" at the top of the tassel as well as the same lengths overall.
Once I was done I had 5 similar tassels.
I laid the 5 tassels out on my workspace, staggering them like the original inspiration piece.
I laid the middle one first, the laid the next two at the same length as well as the end pieces at the same length.
I didn't measure, because it wasn't going to be perfect to begin with.
I took the large dowel piece that I had and laid it across the lengths of yarn.
I slip knotted them onto the dowel, adjusting until I was happy with their resemblance to the inspiration photo.
I added a bit of glue to the knots to secure it while it was hanging.
I added a doble strand of yarn on the ends as the hanger.
And then...
I had this.
Not a bad interpretation, and literally an impactful decor piece for less than $3.00
I used almost all the yarn, but did have enough left for making 5 more smaller tassels.
On a recent trip to Hobby Lobby, I saw this little gem.
The tassels were smaller, the dowel was dinky,
and
wait for it...
It was @13.99 plus tax!
Even at 40% off with the HL coupon, it was still around over $8.00.
I'll take my creation over this one anyday!
Plus, our daughter LOVED it, so it's worth it.


Post a Comment