Tuesday, October 29, 2019

Master Your Week!


One of the misnomers upon retirement is this:

"I will have time to get all the things done that I couldn't get done when I was working!"

Ummmm.....

Well......

That's not necessarily true.  But why?

In my case, it wasn't because I got overinvolved with community activities or things like that.

It was simply that I thought I had all the time in the world now that I wasn't working, totally forgetting that I have the same 24 hours in a day that I did before.

It took me a while to figure out how to RESTRUCTURE that time and really become productive in retirement.

I realized that I needed to practice the same organization techniques that I used when I was working.

I'm going to share those with you today, tweaked to fit my retirement lifestyle.


It first started with my calendar. 

I was always decorating my calendar with washi tapes and stickers, it was the teacher in me!  I loved to lay out the month so that it was colorful and appealing.  

I hadn't been doing that since I retired and found that I really missed it.

This organization was very cathartic and got my brain in gear for everything that was coming up in the weeks and months ahead.

I added this process back into my routine and it proved to me that my brain functions best when I create a colorful and engaging monthly "photo" in my mind as well as on the paper calendar.

No... I cannot use a digital calendar.  My brain doesn't function like that.  I need to see the whole month, not a small version with "dots" indicating an event.


Once the month is done (I add things as they arise during the month), I look at things that will affect the week.

Things like camping trips, meetings, appointments, and commitments.

This allows me to cohesively plan each week of the month.

In order to do that, I created two weekly organizers on my MAC, geared to my needs as a planner.


I created one sheet (right) to map out the "time" of my day.  

This is similar to an appointment log and easy to create on any computer.

The other (left) is a combination of the "to-do" list, blog responsibilities, projects, and appointments.

It too is easy to create and customize on any computer program.


On Sunday afternoon, I pull some of my markers and "fancy pens" and start writing out the upcoming week.


I write down all the appointments for that week.  This is helpful because it affects the "time" chart when I get to that.

I next write out the big projects that I want to tackle for the week.  I found that breaking those projects up into smaller bits helps me to complete them.

I may not get all of that project complete in one week, but if I don't, I migrate the unfinished tasks to the next week when I plan again the following Sunday afternoon.

I then add my "to-dos" down the left side, which I pull from a longer running list in a separate notebook.  (I am always writing out things I want "to-do" on sheets of paper in a notebook I use for random thoughts and brain dumping.)

Once that sheet is complete, I begin to block out my timesheet.


I first mark all the exercise/yoga classes and work-out times at the gym across the weekly spread.

Then, I block out the cleaning I want to get accomplished each day.  (I have a set schedule of cleaning tasks per day.  Let me know if you are interested in seeing how I have organized our house cleaning!)

I next schedule in the set weekly appointments.  

Once those items are out of the way and on the schedule, I block in time to work on the blog, complete the list items, and jump into the projects.

I usually stop blocking time around the 4-5pm section, unless I have an evening commitment or meeting.


I realize that it might seem a "bit much" when you look at it and think "really?"  

I'm retired...why am I doing all of this, right?

Well, I'm retired from my job, but not retired from my life.  I am running a blogging business, still taking care of our home, paying bills, planning vacations, being a long-distance momma, doing laundry, exercising, meeting friends for lunch, etc...  Life is still happening only it doesn't include my former job.

Plus, I LIKE to do things that motivate me and help me to grow as a person.

And, I will tell you that I get so much more done, ON MY TIME, and still have plenty of time to relax and enjoy retirement.

In reality, it makes my time productive which makes me content.


As the week progresses, I mark through the completed tasks.

Things that don't get done this week will migrate to next week and so on as needed.

I find the Sunday afternoon planning sessions to be very relaxing because I'm no longer stressed about what's coming up the next week...

AND

I'm getting all the things done that I want to accomplish.

I don't know how many retired friends say... "I retired to have more time, and I have less time now than when I was working."

Nope...we ALL have the same 24 hours in a day.

It's how you structure those 24 hours for yourself which determines what you get done.

Break those rules and make them work for you!


Saturday, October 26, 2019

Digital Cookbook Stand

I am on IPad #2.

I purchased my original IPad many years ago (I'm thinking it's over 10 years old!).  In fact, it's so old that it has the big charging port and plug.  It still worked, but I was afraid that it would give up before I got a new one and I didn't want to take the chance.

So, a little over 2 years ago I bought a second IPad.  It's still going strong.

However, so is the first IPad!

It still charges, still gets our internet, still is in excellent condition.

So, what to do with it?

After a bit of google research, I decided to use it as a digital cookbook for the kitchen!

Now it just needed a stand.


So, off to Marshall's I went to find a sturdy and size appropriate cutting board.

I found one for $12.99.

I brought it home and rummaged through my wood pieces until I found exactly what I needed.


A piece of lathe strip and a piece of corner trim.

I cut both to the length I needed.  I wanted them to go almost to, but not touching the left and right bottom sides of the board.


Once the lathe piece was cut I just placed it on the corner strip, marked it, then cut it to the fitted length.


A bit of Gorilla Wood glue and some drying time and the IPad ledge was ready for the next step.


I placed the ledge where I wanted it to be near the bottom front of the cutting board.

I used the IPad to test out and help me get the vertical placement that worked for me.


Using my tape measure, I marked two spots about 1.5 inches up from the bottom edge.


Next, using the smallest drill bit I own, I drilled 2 pilot holes clean through the cutting board to the back.


This now allowed me to mark the ledge.


Using the same drill bit, I cut pilot holes into the ledge.

If I had not, the wood would have split had I tried to just nail it on its own.


Now it was ready for the ledge to be attached.


From the back of the cutting board, I hammered in two long finishing nails.

They were hammered flush with the back which gave me a nice reveal of the nails through the front of the cutting board.

I placed some glue along the back of the ledge, including in the small holes and placed them over the nails.

They went in and stopped about a fourth of an inch above the board.  You can see the gap above.


Using a rubber mallet, I gently hammered in the ledge from the front edge into the nails so that it met the cutting board with a flush mount.

I cleaned up any glue seepage with a damp paper towel.


The front was now done, but it needed a way to make it stand up on the counter.


Using another piece of scrap wood for the back support, I cut an angle at the top using my miter saw.

I just eye-balled the angle and worked it against the board until I found the angle that I thought would work best for me.


I drilled two pilot holes through the piece using the same drill small bit.

I then placed it on the back of the board in the spot that I wanted to attach the wood support.

You can see the pencil line that I drew on the board to show the top edge of the angled support.

I placed the support at that line and held it while I drilled down and through the support just enough to create guide holes for the next step.


Using some small screws that I had, I drilled them into the support so that just a bit of each was revealed on the other side.


Now, all I had to do was line up those screw points inside the pilot holes on the back of the cutting board.


Once that was done I finished drilling them through so they grabbed the board and were very sturdy.

I did not glue here because if I want to store this I can easily unscrew the screws and remove the support piece.


It worked exactly how I envisioned it!


I love when my plans come together so easily and quickly.


Now it was time to condition it for use.

A bit of Formby's Tung Oil will seal it nicely without compromising the color of the wood.


Now, my OG ("original gangster") IPad has a new lease on life.

It's a great way to grab those Pinterest recipes that are saved on my account.

I can also watch YouTube videos, Amazon Prime, or listen to music as well while puttering in the kitchen.

The total cost was just $12.99 for the cutting board.  I had the other bits and bobs lying around.

I love being a Repurposed Rule Breaker!

Tuesday, October 22, 2019

Upcycling Thrifted Jeans

By now, you are probably aware that I love to sew, especially when I can refashion, recraft, or upcycle a thrifted garment.

Today, I am going to share how I took a pair of $4.50 thrifted jeans, some fabric that I had on hand, and simple sewing skills to create an easy bag that I take back and forth to the gym.

Let's get started.


Here are my jeans and fabric that I matched from my stash.

The large floral is from a collection of companion colorways that I purchased from a local fabric outlet for $2.00.  


The jeans were from a local "Teen Challenge Thrift Shop" that I love to visit weekly.

They have great housewares and decor, and rows of clothing items.  I grabbed 2 pairs of jeans a while back and used the darker pair for this project.


I started by using bulldog clips at the top of the jeans so that the waistband was even all the way around.

This was important because worn jeans tend to "slip" in the front.  If I had cut them without doing this, I would have had an uneven back and front length.


Next, I needed to slice up the inside seam, through the crotch area and back down the other leg.


I used a sharp pair of shears to cut as close to but not on the rolled seam.  You can see that on typical jeans the inside seam is rolled over and then sewn.


Once this was done, I folded over the front part of the crotch seam to make the jean fabric flatten against itself.

Pants are cut on curves because if you took a side cross-section of your body, there is a curve from the lower back down through the crotch area up to the belly.

You cannot just sew a cut crotch seam without cutting up into both the front and back of the pants.


So, using those same sharp scissors, I cut up the front seam to the point where the jeans would lay flat on itself.


See?

That point is actually the center of the crotch on the jeans.

Now the front part of the jeans lays flat.


I repeated that same process with the back of the jeans as well.


Where the two legs meet (finger) is where the bottom of my bag will be sewn.


Using a ruler and a black pen, I marked that on the front side only and then cut straight across through both the back and front layers.


Here's the result.

Can you see the bag starting to form?

(You can also follow these same steps to create a jean mini-skirt as well...)


Using pins to secure the left and right sides to each other, I sewed a seam from my finger down to the bottom.

I followed the curves of the top layer so that you cannot see the blue thread of the seam.


I did the same thing in the back.


Next, I sewed the front pocket lining down on the edges so that they did not pull inside out once the bag was finished.


From the outside of the pocket, you can't even see the seam because the thread blends so well with the jean fabric.

At this point, I removed the bulldog clips, turned the jeans inside out and sewed a seam at the bottom of the two sides.

I now had a bag, BUT I wanted to create a "real boxed bottom."

This is easy to do on any bag.


I measured the bottom seam from the edge (point) at 3 inches and made a mark.


I folded the seam open so that it forms this triangular section.

I drew a straight line from side to side as a guideline for my seam and then put fabric to needle.


This is the result.

A boxed bottom to my bag.


Now I needed to make two handles.

I took one of the legs and cut two even length pieces that were 4 inches wide.

(I'm keeping the other leg for a future project)


I folded each side over an inch, meeting their raw edges in the middle to the strap.


Next, I folded in the middle so that the original folds met together.

This means that you never have to make a "tube" of fabric then turn it inside out!


I sewed two seams down each side about a quarter of an inch apart.

This gave my strap a bit of stability and stiffness.

I set them aside and got to work on creating the inside lining with the floral fabric.


I knew that this fabric was not quite enough yardage front top to bottom to fill the inside.

To make it work, I added a blue strip to each side's top area.  This gave me the added length that I needed.


I sewed them together then "stitched in the ditch" (which means to stitch along the seam from the right side to hold the fabric flat) as a finish to the lining edges.


I created a small interior pocket and stitched it to the lining on one side.


I topped that with a bit of a coordinating fabric as well.

I sewed down both sides and across the bottom of the lining to create a "bag/lining" to go inside my jean bag.

I boxed the bottom exactly like I did the jean bag.


Now it was time to place the lining inside the jean bag.

Keeping both bags, as shown above, I placed the lining inside, matching the top edges.


I started by placing clips at certain points on both bags.

It's easy to explain it like a clock.

I placed a clip at 12 and 6 o'clock so that my lining front and back met up exactly with the front and back of the jean portion of the bag.

Then, I clipped at 3 and 9 o'clock where the seams of both bags met together.

This left me to work between those clips and evenly distribute the lining and the jean bag.


I now placed one end of a strap where I wanted it to be in relation to the front of the jean bag.

I "sandwiched" it between the jean portion and the lining, and then used clips to hold it in place.

I took the other end of that same strap and repeated this process on the other side of the front.  I made sure the strap was straight from one side to the other.  I matched this strap placement on the back of the bag as well.

I used the bulldog clips to hold the jean fly together as there were two layers of fabric plus the lining.

Prior to sewing, I made sure the bag hung at a point the was comfortable on my shoulder.


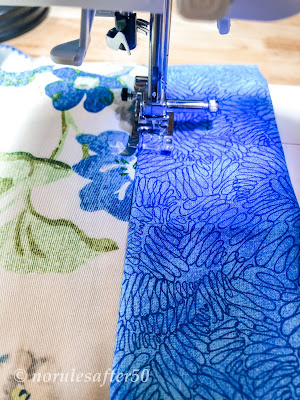
I now took this whole thing to my machine and slowly stitched about an eighth of an inch down from the edge, through all the layers of fabric, all the way around.


Super easy when you take your time.

Especially when you have this at the end...


An upcycled jean bag!

It has both the front and back pockets from the jeans.  One is perfect for housing the lock that I use in the gym locker room.

The bag holds my lifting gloves, some essential oils I used when working out, my notebook, my headphones, a spare glasses case (to hold my glasses during yoga), and any other items I might need for the gym.

I've clipped my gym swipe card to the belt buckle and add my car keys when it's in the locker.

It's dedicated just for the gym, but could easily be used as a purse or bag for another purpose as well.

It's a great "rule breaker!"


© No Rules after 50. Made with love by The Dutch Lady Designs.