Tuesday, July 30, 2019

No Cost Inspirational Art

At the last minute, right before leaving to cross the U.S. to move our daughter into her North Hollywood apartment, I created some inspirational art specifically for her.

As an aspiring actor, she has a challenging road ahead of her.

I wanted her to know that it's okay to follow your dreams, even if it takes a lifetime...

because that's what life's about.

So I went into my wood shop area to grab some materials I already had on hand, printed an inspirational message from my computer, and grabbed a small canvas from my crafting supply and started the creative process.


These Medai boards were bought last year in the craft section of Tuesday Morning.  I had the white craft paint and the brush on hand as well.

I used the 5x7 inch board.


I started by covering the one side with a coat of the white craft paint.

These media boards have a texture and I didn't want that to hinder the final idea I had in my head.


Once it way dry, I printed out the inspirational saying on regular printer paper.

I knew it would wrinkle up because it was thinner than traditional crafting paper, but that was something I wanted to happen to "age" it.

The saying speaks for itself!


Before I started, I placed the canvas over the back of the printed paper, lining up the saying.

I drew a pencil line around the canvas.  This will help with placement once I finish up the next step.


I took my trusty Matte Mod Podge and painted a thick layer right onto the canvas.


Using the pencil line, I placed the canvas down onto the back of the paper then flipped it over.


At this point is looked like a hot mess, but that is only because it was wet and wrinkly and not trimmed.

I used my finger to carefully push out some of the wrinkles but I didn't go over it too much.

I knew that when dry it would look much better.


Once it was fully dry, I took a cocoa brown craft paint and a slightly damp paper towel and began to "age" the front.


Light swipes and sweeps over the canvas, checking as I went allowed me to "age" it.


I went a bit heavier on the edges and sides, creating a "highlight" in the center.  This draws the eye to focus on the saying.

I let this dry thoroughly as well.


Once dry, I flipped the canvas over and used a razor to carefully trim the excess paper away from the edges of the canvas.


Remember the "Jenga" piece projects (plant stand and coasters) I made with the Dollar Store version called Tumbling Towers?

I had 7 pieces leftover and knew these would provide a great underlying structure for this project.

I glued two at each of the top corners, leaving a space in between at the very top.

Two were glued on the bottom sides and one was glued at the very bottom.

I let these dry in place.


I had cut down and stained some leftover lathe strips.

I measure them so that the corners would overlap in a successive pattern around the piece.


I started by placing my wood glue onto the sides of the blocks and spreading with my fingers.


This creates a solid surface for the framing pieces to attach and "frame" the canvas.


The other thing those pieces did was allow the width of the lathe pieces to extend beyond the front of the canvas, creating a very modern style of framing with almost a shadow box look to it.


Here, you can see how to just butted on edge to the overlap of the corresponding lathe piece.  I did this all the way around, creating cohesive and well met corners.


The back side looked like this.

You can see the overlap at each corner and then really appreciate how those small pieces created structure and support for the lathe frams.


While the frame was drying I used 2 large ribber bands to "clamp" it in place and provide enough pressure to stabilize it while it set up.


At the top, where I had left that gap, there's now small space for hanging it on the wall with a brad nail.

The piece weighs only ounces, so you could even use a thumb tack to hang it.

And voila... it was done.


Here I had it just sitting up on my craft desk, which would be another way to display it.

We actually hung this in Syd's apartment, right next to her bed over her nightstand.  This way it can inspire her every morning and every night.

Sometimes life is about risking everything for a dream no one can see but you.

I think that's the definition of breaking the rules!


Saturday, July 27, 2019

Sydnee's Hollywood Apartment

We moved our youngest to Hollywood at the end of June.

She's an aspiring actress, having graduated college with a performance degree.

She is fearlessly pursuing her dreams and we are so proud of her.

But first, this momma had to get her "nested" and settled into a new apartment, a new state, new city, and new life.

Here's how it all went.

Sydnee used apartments.com as her go-to source of available, AFFORDABLE, apartments in the North Hollywood area.  The place she settled on came up and through the magic of the internet, she procured her studio apartment.

We drove her out, along with about 20% of her previous belongings, on a five-day trip to LA.

Here's what greeted us upon arrival.


Beautiful courtyards with spaces for sitting and relaxing.


Light-wrapped palm trees surrounding a fountain.


Plants that I've yet to identify, in full bloom.


Strung cafe lights across landscaped walkways, nestled among the apartments.


Private gated swimming pool and spa.


Mature palm trees right outside her courtyard door.


Outdoor gas grill for use by the residents.

We were in awe...

Next, we got access to her studio apartment.


A spacious main room with freshly painted, two-toned walls in a creme and taupe colorway.

It has a generous closet with frosted sliders.


Nice dark laminate floors throughout the entire apartment.


A cute kitchen with gas stove and frig.


Plus, it had PLENTY of storage space for such a compact area.


Perfect for one person.


A  bathroom suite, with separate tub and loo room.


The bathroom also had a second closet space with the same frosted sliders, but it was even bigger than the one in the main room.


And there was a deep floor to ceiling storage unit next to the tiled bathtub/shower.

We were thrilled!

Want to see what we did with it in three days time?

Taa Daaaaaa!!!


In the kitchen, we only added a few decor items to make it a fun place for my girl to cook (which she loves to do)!

We added a knife bar next to her stove and then accessorized the back part with some needed cooking items.


Her microwave fit perfectly into the cubby space created by the cabinets.  It leaves her plenty of room for prepping on that side as well as the other side.

We hung her towel and a few prints that she brought with her.


Below the raised counter space we added her IKEA Raskog cart as a rolling "island" for cooking.  It holds her prep and cooking utensils, tea-towels, and a few other items.

A back door carpet, Command key hook, and her trashcan finished the space.


In her bathroom, she added her everyday items, filled her drawers and cupboards, and set it up the way she wanted.


We hung pictures and items that she already had and added some fresh flowers.


She had picked out a new shower curtain to add some color to the space. 


She put several items in the large storage area, but there is still plenty of room if needed for additional items.

We hung some Command hooks in silver to add additional towel hanging space.


She used the bathroom closet as her main closet, adding some decorative touches to it.  Since she didn't want a dresser for clothes, we grabbed a few of these white bins from IKEA to stand-in as "drawers" on the top shelf.


In the main area, we created two separate but equal spaces.

The window side became the living room/dining room.

Two IKEA stools at the bar area are all she needs for right now as a dining area.  If she had friends over, they can always eat al fresco at the tables in the courtyard areas.

I had made the hairpin coffee table for her for Christmas.  The oriental carpet had once belonged to her grandparents and is a jewel of blues, pinks, greens, cremes, reds, and browns.

The rest of the furniture, the curtains, the light, and stripped pillows came from our trip to IKEA in Burbank.


The pale pink sofa is so deep and comfortable.  It fit perfectly with her BoHo, Eclectic decor desires.  

I had made the black and white pillow from a king pillow we had, adding the little tassels on each corner.  It makes for a perfect lounging pillow when on the couch.

Long ago, I had Mod Podged a Marilyn Monroe poster to a blank canvas.  We bought these carved wooden rounds in Burbank at Marshalls to off-set the poster.


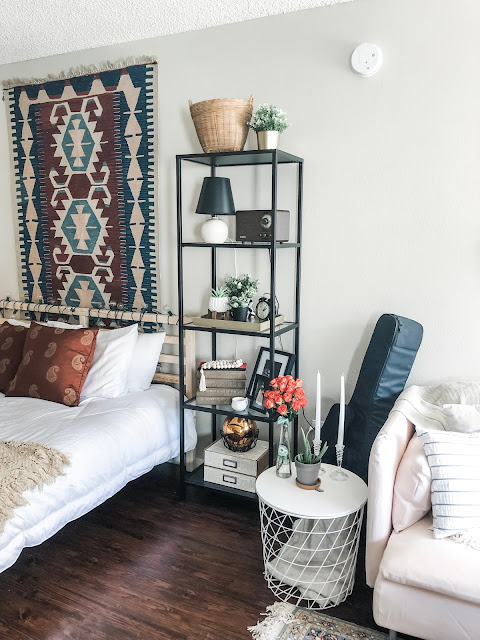
To give separation to the room without blocking the light and view, we added this IKEA glass and iron shelving unit.  

It was the perfect piece to break up the expanse of the wall.

If you look closely, you can see some of the projects I created and blogged about earlier - the boxes, the plant stand, and the wooden beaded necklace are there!


We picked up the wooden bed and mattress at IKEA, along with the white side table.

My dad had gifted Sydnee this carpet, which made a great backdrop to her headboard.  It coordinates well with the other carpet and adds to the overall feel of her decor theme.


Across from the living and sleeping area was this long wall.  

We decided to put her TV here so that it can be viewed from both the areas.

The "Well Behaved Women" poster had shown up on my FB newsfeed, so I purchased it and framed it for her apartment.  It depicts strong women from history and all walks of life.

I wanted it to inspire her on days when things might seem too hard.

I thought it was her to a T.


I had redone this dresser many, many years ago, and she had been using it as her TV stand.

That was the largest piece of furniture that made the trip cross country.  It gives her additional storage including a "junk drawer."  Everyone needs to have at least one junk drawer...

We added framed posters that she already had, including this Beetles poster. It's actually a vintage piece that we've had for quite a while.


I turned her second Raskog cart into a rolling bar and drink cart.  

It's a great place to keep extra drinks, cocktail napkins, and antique coasters.

Friends of ours have two peacocks and had given me several of their shed tailfeathers.

As I was driving behind her on our trip out...I could see the feathers fluttering inside her car.


Here's our darling girl... Sydnee.

I talk to her every day...either a text message or phone call.

She's loving life in California and is excited to learn more about her area and the opportunities that are there.

She's an amazing human being and we are so proud of her and humbled by her determination to pursue her dreams and live her best life.

It's really all we can ask as parents, isn't' it?


© No Rules after 50. Made with love by The Dutch Lady Designs.