As you may already know, one of my goals in 2020 was to cook more at home, especially looking for new recipes and homemaking tips.
I started in early January making this no-knead bread, and let me just tell you, we are HOOKED!
(Of course not realizing that a pandemic would see us actually making our own bread.)
Breadmaking can be very intimidating, especially if you really don't understand the science behind it.
But this recipe is no fail!
Let's get cooking.
(Recipe link at the end of the post)
You will need a few basic baking supplies: flour, sea salt, instant or active yeast, water, bowl, measuring cups and spoons, plastic wrap, and dried Rosemary IF you want to add it.
You can make great bread without Rosemary.
You will also need a dutch oven, but that's for AFTER the dough has risen.
After the 12 hours, when you are preparing the dough for baking, you will need to preheat your oven to 400 degrees AND place your dutch oven with lid into the oven to ALSO heat to 400 degrees.
The dutch oven is a clever bread oven, but only because it has collected the heat and will use that to radiate all around your bread dough when cooking.
But, I digress... back to preparing the dough.
You want to measure out your flour, making sure to tap the bottom of your measuring cup so that the flour settles into the cup. Use a flat knife to cleanly remove any flour overfill.
You will add your 3 cups of flour to your bowl.
Next, add the sea salt and mix the flour and salt together.
Make a well in the middle of the mixture.
Here is where you place the instant yeast.
If you use an active yeast that you have to prove before adding it to your dough, you would do that and then add it in your flour well the same way.
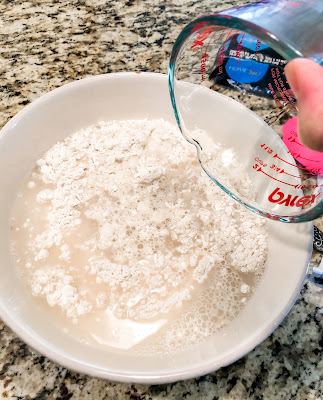
Next, add the warm water - preferably no hotter than 110 degrees.
I use tap water as it will come out hot enough.
Add the dried Rosemary to this.
The recipe calls for fresh Rosemary, but I have NEVER used that.
Instead, I add about 3/4 T of the dried.
Now, dig in with your hands and begin mixing the dough.
You can initially use a spatula or wooden spoon, but the best way is to make your fingers into "claw-like" stirrers and really work all the ingredients together.
Your dough is ready when most of it releases from the side of the bowl and attaches to itself.
Leave the dough in the bowl.
It will be a ball that takes up about half of the bottom of your bowl.
Cover with plastic wrap and then place a tea towel over that.
Let it rise for at least 12 hours in a warm dark place.
The dough needs time to double in size which is the yeast creating all that fluffy goodness.
Now is the time to turn the oven on to 400 degrees AND PLACE
When you remove the towel and the plastic wrap, you will have a bowl full of bread dough, ready for the next steps.
Use your fingers to pull it away from the side of the bowl.
See all those stretchy bands of dough?
That's the gluten, which means that your bread is going to be delicious.
Sprinkle a generous amount of flour on your countertop.
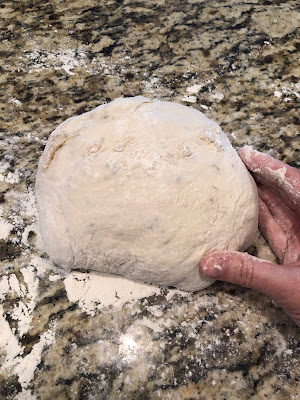
Dump out your dough onto the floured surface, making sure to get all the bits from the bowl.
Without kneading the dough, pull it a bit to form a wobbly rectangle and fold it over on itself.
You are basically tucking in the sides of the rectangle to form a ball-like shape.
It doesn't have to be perfect.
The baking will make it into a rustic type of bread, so you want a bit of an organic look to it.
CAREFULLY, remove your heated dutch oven and lid from your 400-degree oven.
Remove the lid and place it aside while you CAREFULLY place your dough ball into the dutch oven.
Replace the lid and put it into the oven on the middle rack.
Leave the bread to cook, with the lid on, for 30 minutes.
At the 30 minute mark, remove the lid and place it aside.
You want your crust to brown up and bit more and get a bit "crustier."
Now you are going to bake the bread, uncovered, for an additional 12-15 minutes.
You can check it to make sure you are getting your desired crust color.
Pull the dutch oven out and the timer and you will have the most beautiful, rustic looking Rosemary bread.
Your home will smell amazing as well.
I dump the bread immediately onto a cooling rack.
The bottom, where you can see the folds you made, should have a nice brown color to it.
If you knock on it it will sound hollow.
This is exactly what you want to hear.
We like to cut a few pieces off immediately, slather on some REAL butter, and have it right then and there.
We will eat on this loaf for about a week.
You can't keep homemade bread for much longer than that because there are no preservatives to extend its shelf life.
That's when you know it's good AND god for you.
Here's the link to the recipe I found on Pinterest though the "Cookie Rookie."
(She also has a video to accompany the recipe if you like a visual demonstration.)
It's NEVER failed me.
Enjoy making bread!
You can do it.


Post a Comment